How to Track Google Ads Form Conversions Using Tag Manager
You may be investing thousands of dollars generating clicks and pageviews via paid ads. But are you generating a profit? Conversion tracking is key to measuring your effectiveness in turning traffic into paying customers.
Get a Free Marketing Analysis and Consultation
Nowspeed can review your Website, SEO, PPC, Email or Social Media Campaigns and identify ways to make an immediate impact!
Measuring the success of your ads requires knowing if people are doing what you want them to do on your website—not just whether they’re clicking your ads.
Many small businesses using Google Ads simply create some ads, point their ads at their site, and run them, only measuring their success by the number of clicks they get. But in this case, you have no idea what visitors are doing on your site when they click an ad. You may just be burning money.
A much better measure of the success your ads is the number of conversions they generate—purchases, quote requests, phone calls, newsletter sign-ups, even whether someone scrolled down to a certain point on a landing page. The types of conversions relevant to your business will vary depending on your circumstances, but regardless, if you’re not measuring your success in terms of what you want your ads to get people to do, then you’re flying blind.
You want your website to be able to communicate back and forth with Google Ads. Let’s take one of the most basic types of conversion, form submissions—when someone fills out and submits a contact form, quote request, newsletter sign-ups, and anything else where someone gives you their contact info via your website.
To measure how many form submissions you’re generating from your Google Ads campaigns, Google Ads and your website need to be able to communicate with one another:
- When someone clicks one of your ads, Google Ads knows which ad they clicked, and what they searched for.
- Once they are on your site, Google Ads then needs to know if they complete a conversion, such as by using your contact form. When they click the “submit” button on your form, your website then needs to be able to tell Google Ads, “Hey, that person who clicked the ad ended up submitting a form. Please count that ad click as a conversion.”
There are a variety of ways you can set up your website to talk to Google Ads, some easier than others.
The easiest way to feed form-based conversion data back to Google Ads is with Google Tag Manager.
When setting up your website to communicate your Google Ads account, this typically involves adding a piece of HTML to your website’s pages. This can be done manually, by literally pasting a small bit of text into each page. But this is a lot of hassle. Thankfully, Google has created a free online application, Google Tag Manager, that makes it easy to integrate your website with advertising platforms, such as Facebook and Google Ads. Tag Manager can also be used to communicate with Google Analytics and other analytics platforms, allowing you to not only track the behavior of people who click your ads, but also those who come to your site from organic searches, social media, and elsewhere.
For those who using Google Ads, Tag Manager is a must when it comes to tracking conversions, making it far easier to track your ad campaign performance and calculate the true return-on-investment of your marketing efforts.
But first you need to set up your Google Ads account to track form conversions.
If you do not already have a Google Ads account, first create one and set up an ad campaign. Once you’ve done so, or if you already have an existing ad campaign, then it’s time to create a conversion—a defined behavior tracked in Google Ads that you want people to do when they click on your ads.
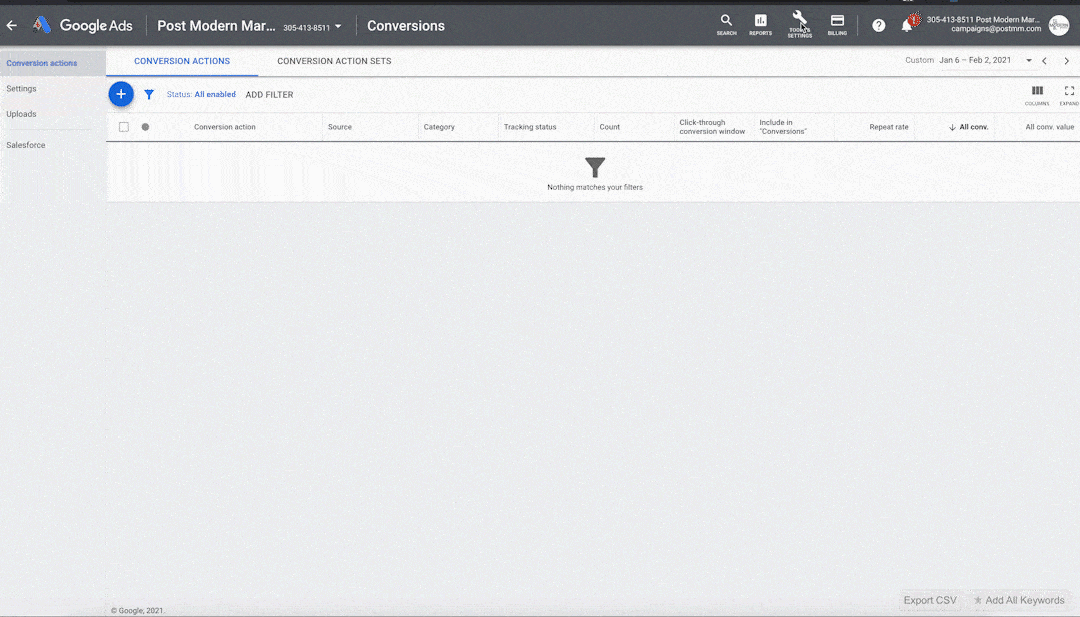
To create a conversion metric, go to Tools & Settings > Conversions, and click the blue + sign near the top left. Select Website, which will take you to the page where you can create conversion actions.
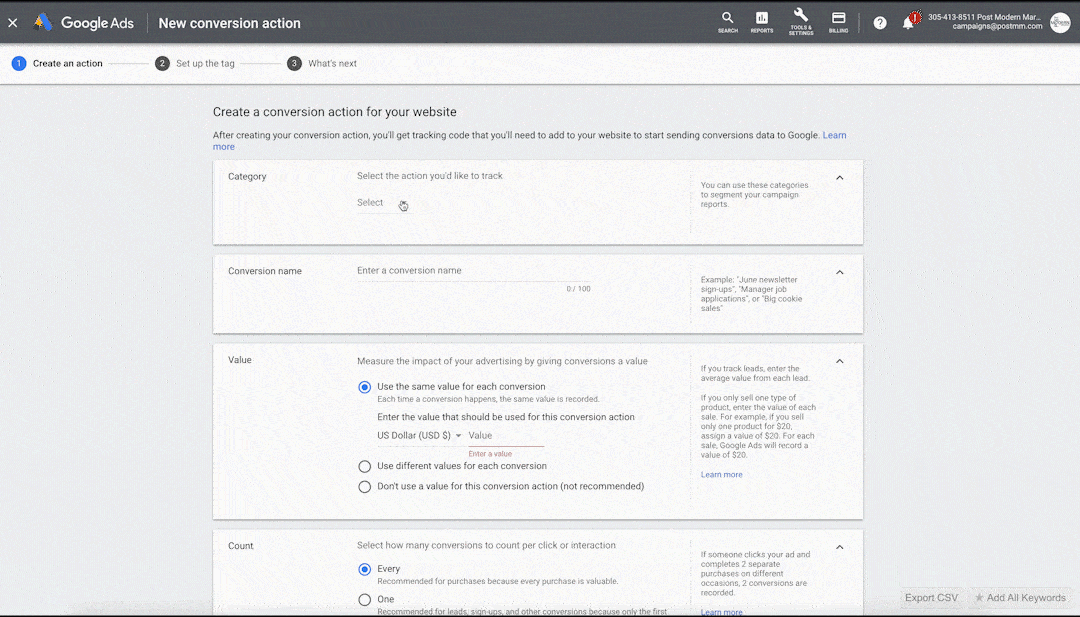
In this example, we’re going to be creating a form conversion. As mentioned above, this simple type of conversion allows you to tell when someone who’s clicked on an ad proceeds to submit a contact form, signs up for a newsletter, or makes a purchase.
Form submissions can be found in the Category dropdown menu. Select the option that is most appropriate for your campaign. Create a name, and select a Value option appropriate for your business. You may select “Don’t use a value,” which means that you aren’t assigning a dollar value to the conversion. However, assigning a value to conversion can be very handy, as this allows you to very easily calculate the estimated ROI of your ads.
For instance, you may know that one out of every 4 contact form submissions result in a sale, and the average value a deal is $1,000. In this case, the average value of one conversion is one sale divided by the average number of leads it takes to generate one sale, or $1,000 ÷ 4 = $250. Assigning a value also makes sense if you’re using the conversion to directly track sales made on your website. If you know the average value of a sale, that should be entered as the value.
Next, under “Select how many conversions to count per click or interaction,” you will likely want to select One. This is because someone may submit a form multiple times, but will only represent a single lead. However, if you’re tracking actual sales, then you should select Every. You can choose to leave the remaining options as is, but it would be wise to do some research to determine what’s best for you, particularly with regard to the Attribution model option. The attribution model option allows you to decide how much credit each ad interaction gets for your conversion. Many choose the last click option, which means the only recorded conversion is the very last click, regardless of other ads the lead may have clicked on. But you can also select first click, linear, or one of the other choices to more accurately track conversions based on your campaign goals.
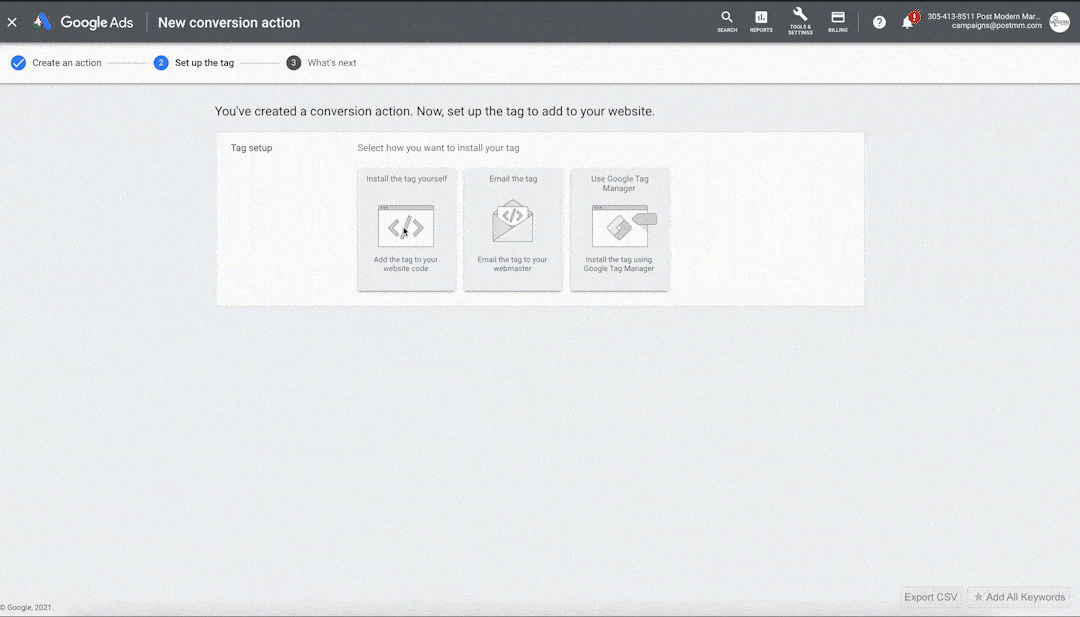
Once you set up the specifics of your campaign, Google Ads will tell you that you have created a conversion action, and you now need to set up the tag on your website. Choose the last option, Use Google Tag Manager. This will display a set of instructions, along with a Conversion ID and Conversion Label. (If you wish to set up tracking for a conversion action you have already created, go to your list of conversion actions, click on the name of the desired action, click the Tag setup dropdown near the bottom, and click Use Google Tag Manager.)
Do not close your Google Ads tab. You will need to reference the Conversion ID and Conversion Label later in this process.
Create your first tag in Tag Manager by creating a conversion linker tag.
Before proceeding, if you haven’t already, you will need to set up and install Tag Manager on your website. This process is a little technical, so if possible, have a web developer handle this part. However, if your site is built using WordPress, there are many guides for installing Tag Manager in WordPress.
Once you have a container created for your website, and Tag Manager has been installed on your website, you’re ready to proceed.
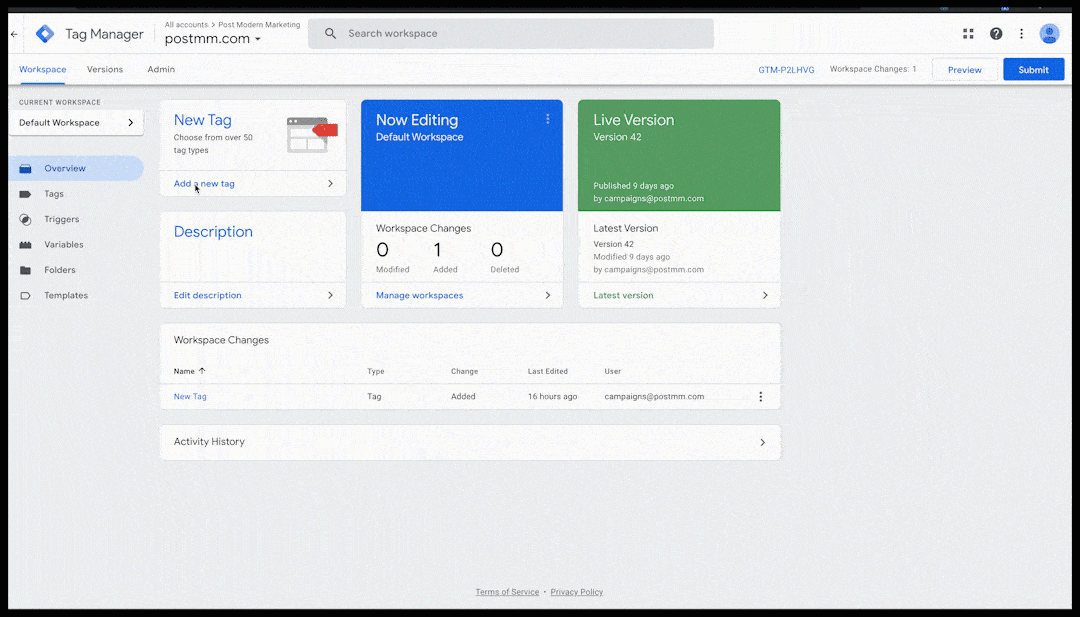
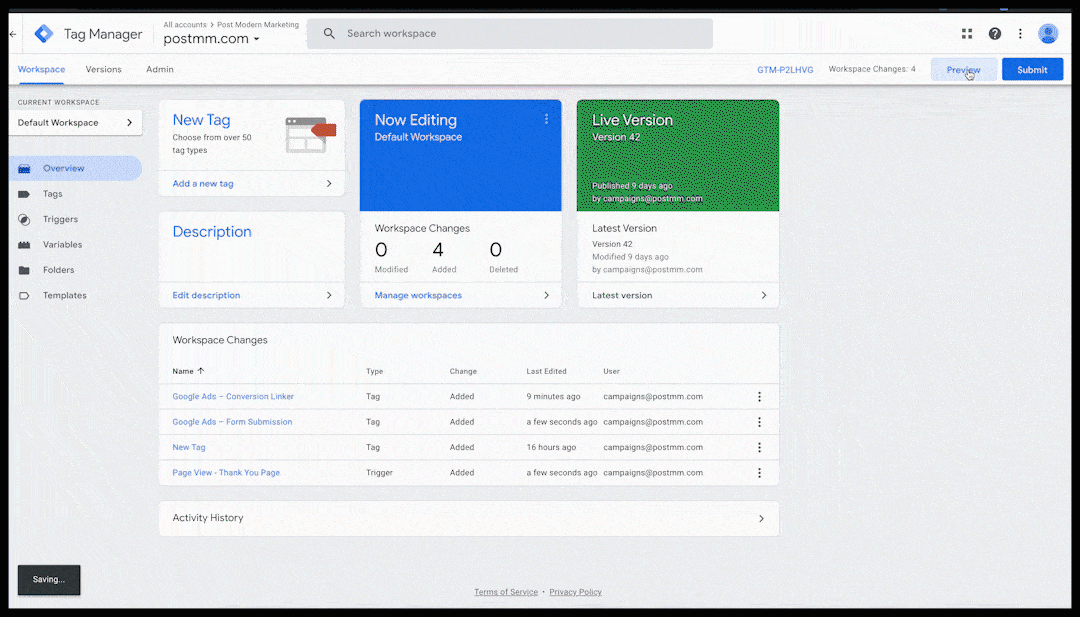
When you log in to Tag Manager, you will need to click on the URL for your website in the Accounts list, which will take you to the Default Workspace. On the left-hand side, click on Tags. Assuming you are starting from scratch, there will be nothing in the list of tags.
Before we do anything else, you need to set up the Conversion Linker tag. This tag allows your website to track a user’s journey from the initial landing page to the point of converting.
To create a tag, click on New at the top right of the list. In the new window click on the name Untitled Tag. Delete this text and replace it with a name that will be easy for you to remember, such as Google Ads – Conversion Linker. Then, under Tag Configuration, click anywhere in the white rectangle to open the Choose tag type screen. Near the top, in the Featured section, you will find Conversion Linker, with a blue icon featuring arrows pointing to the left and right. Click on it. You will be taken back to the previous screen. Chances are that you will not need to change the Linker Options now shown under Tag Configuration. Instead, proceed down to Triggering. This section allows you to define when a tag is activated. In this case, we want the Conversion Linker tag to fire every time someone goes to a new page.
Click in the white rectangle under Triggering. There should not be any options in the Choose a trigger list. Instead, click on the + in the top right corner, which will bring up a screen where you can create a trigger. Replace the default Untitled Trigger with something descriptive like All Pages or All Pageviews, then click on the rectangle under Trigger Configuration. Under the Choose trigger type list that appears, select Page View from the top. You will be taken to the previous screen, with Page View selected. You will now see a toggle with the options All Page Views and Some Page Views. Leave All Page Views selected and click the blue Save button at the top right. Then click Save to save your new tag.
Now you can actually set up the Google Ads conversion tracking tag.
Click New again, and repeat the above tag creation process. Name your tag something like Google Ads – Form Submission. Under Tag Configuration, select Google Ads Conversion Tracking from the list. Under Tag configuration you will see several blank fields. Flip back to your Google Ads browser tab with the conversion setup information. Copy the Conversion ID and Conversion Label text and paste each into the fields on the tag setup page with the corresponding names. You can leave the other fields blank.
This time, the Triggering setup is going to be a little trickier. We wanted the Conversion Linker tag to fire on every page, because we want it to track a user’s movement throughout the site. But the Google Ads Conversion Tracking tag is what tells Google Ads, “Hey, you got a conversion, update your records.” So, it should only fire when someone converts.
Knowing when a user takes a desired conversion action requires understanding what happens on your website when a desired action occurs.
Odds are that your website is designed to get someone to submit a contact form, submit a quote request form, or purchase a product or service. Our philosophy is to create a specific page for form submissions. If a user submits a form or completes a purchase, they are taken to a “Thank You” page with the obvious URL of “thank-you” (e.g. mywebsite.com/thank-you/).
A “Thank You” page makes conversion tracking easier. Just as we did with the Conversion Linker, we can set up our conversion trigger by clicking on the Triggering rectangle, clicking the + at the top right, clicking on the Trigger Configuration rectangle, and selecting Page View. But this time, we aren’t going to leave the All Pages toggle selected. Instead, select Some Page Views, which will then display additional menu options below, labeled “Fire this trigger when an Event occurs and all of these conditions are true.” Basically, it’s a three-part if-then statement (which you will be familiar with if you’ve done any amount of coding, or used IF statements in Excel). In the drop-down on the left, select Page URL. In the middle, if it’s not already selected, choose contains. In the text field on the right, enter the URL for the page (only the stub, the part coming after the .com/ in the URL). In the case of our usual site setup, we specify thank-you. Hit the blue Save button in the top right, name your trigger in the field at the top left of the window, hit Save again, and your Google Ads conversion tracking is set up!
However, your website might not work like this. Some sites do not take the user to a new page when a form is submitted and only display a small message similar to “Thanks for contacting us!” If this is true of your website, the above approach won’t work.
If a form submission on your website does not redirect to a “Thank You” page, you can measure conversions by tracking button clicks.
When you set up the trigger, instead of going to choose Page View when you click on the + on the Trigger Configuration window, look for the section labeled Click, select the item labeled All Elements. You’ll be taken back to the configuration window, and as with Page View, you’ll now see a toggle with the options All Clicks and Some Clicks. Choose Some Clicks. In the first dropdown select Click ID, or if you don’t see that option, select Choose Built-In Variable… and then select Click ID. Then in the second dropdown, select Contains.
The next bit is a little tricky and requires some technical skill. In another browser tab, pull up the page on your site where the submission form is located. Right click on the submit button and select Inspect Element from the menu. If you’re using Chrome, you’ll see a window open up on the right side of the browser screen with a lot of indecipherable text. Just below the gray box, in a sort of header area with three dots on the left, you’ll see some text. That is the unique ID for that submission button.

If you’re using a browser like Edge or Firefox, the behavior is a little different. You’ll be shown a window with some raw code, with the relevant bit of code highlighted in blue or gray. Look for a string of text that reads:
id=”some_string_of_text”
That bit in the quotation marks is the ID. Copy that chunk of text (without the quotation marks), flip back to the Tag Manager tab, and paste it into the right-hand text field. Then you can save your trigger and the tag as described above, and your tag will be set up to track a conversion every time someone fills out the form and clicks the submit button.
But wait, you still need to make your tracking tags live.
At the top right, you’ll see a blue Submit button. Click this button to bring up the Submit Changes window, which gives you the options of assigning a Version Name and Version Description to the changes you’ve made. Click Publish, and you’ll be given another change to fill out those fields. Click either Continue or Skip to publish your changes. You will then be taken to a page that lists all the changes made, and your changes will be live!
Always test your conversion tags to ensure they work correctly.
To test if your tags are firing, click on Workspace in the top left menu on your Tag Manager account. Select Preview at the top right. An orange rectangle will appear on the screen, titled Now Previewing Workspace — Default Workspace.
Open another tab and navigate to your website. You should notice a Tag Manager window in the bottom third of your screen. If not, disable ad blockers.
In the Summary section of this window look for the labels Tags Fired and Tags Not Fired. If everything is working properly you will see your Conversion Linker tag under Tags Fired and your Google Ads conversion tag under Tags Not Fired. If you fill out your form and click the submit button, the conversion tag should move up into the Tags Fired section.
Setting up conversion tags using Tag Manager is an important step. It allows you to effectively track leads that come from your Google Ads campaigns. Over time, you can use this tracking data to create more refined ads that result in more clicks and conversions.
So let's
talk.
We're always excited to dig into the details of your company and what strategy can help you meet your goals. So let's talk and lay out a plan for success!